Share
Pin
Tweet
Send
Share
Send
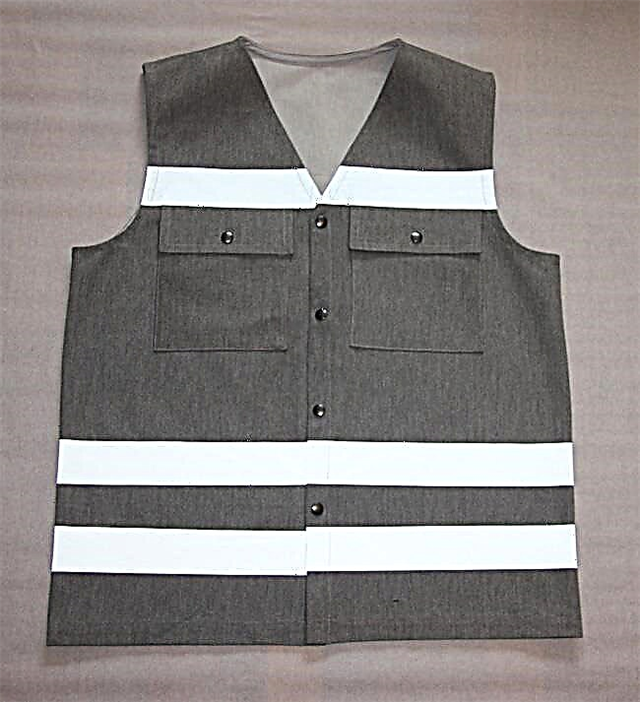
Under the new rules, now every motorist should have a vest with reflective tapes. And where to get such a vest? That's right - do it yourself!


The vest is necessary so that during a stop in the dark, the driver should be visible on the road.
DIY a retro-reflective vest! Moreover, this is not difficult at all. All you need is a desire and a meter of suitable fabric. It should be easy to care for, little creasing, resistant to dirt and wear-resistant. The vest must protect the clothing from possible stains, for example, when changing the wheel.
Thick denim fabrics and cotton / cloak fabrics of any color are well suited for this. The main thing is not orange, so as not to look like a road worker.
If you do not have a car, then this vest can be sewn as a gift to a fisherman, mushroom picker, hunter, just add more pockets and do not sew reflective ribbons. It will turn out a convenient and multifunctional thing.
Men's vest in 5 days: master class
To sew a reflective vest, take as a basis a pattern of a male jacket model 122В from Burda 12/2017:
- Best-seller
- Special offer

- 1
- 2
- 3
- 4
Transfer to tracing paper all the details of the model, except for the sleeves and the collar. It is better to remove the pattern a size larger so that the vest can be worn on a winter jacket! For this, you can cut deeper armholes.
You will need:
- fabric for a jacket - 1 m;- reflective tape - 4 m;
- a slanting inlay is cotton, not narrow, it is better to take it wider or cut it out yourself - 3 m;
- buttons for fasteners - 5 pcs or Velcro tape - 20 cm;
- threads;
- pins, needle, chalk, ruler;
- scissors
Step 1
We remove the pattern and connect the coquette with the shelf and back.
We apply the patterns of the shelves and backs to a piece of tracing paper so that the armhole becomes intact. Glue them. We will make the vest straight and without side seams.

Then increase the length by 10-15 cm. You can and more, depending on how tall your man is. To the edge of the board add a double bar 3 + 3 cm.

We draw the neck of the shelf obliquely from the shoulder to the yoke.

We turn the bars on the shelf.

And only now we cut off the neck and unscrew the bar. Its top will become serrated, and it will be necessary to cut it.

Draw the location of the tapes.

Draw the location of the pocket. I decided to make a pocket with a valve, and put the valve under the tape to sew them in one line.

We make a pocket with a 4 cm edge on the top. The valve will be folded below, so in a cut it will be 16x12 cm. And we cut out the valve and pocket in 2 parts.
Step 2

We fold the fabric in half, put the back on the fold of the fabric.

Cut a vest with allowances of 1.5 cm across all sections, the bottom - 4 cm. Do not make allowances along the planks! Cut the fabric right along the edge of the plank! The pocket and valve have 1 cm allowance.
Step 3. Preparation of pockets and flaps

Since the fabric does not stretch and is dense, I did not glue the linings and valves. In a thin and soft fabric they can be strengthened with glue. We do not glue the bar, because the second fold of the bar replaces the glue. To turn off a pocket turning on a wrong side, and to turn off an allowance of 1 cm on a turning and to pin. Fold the valve in half, chop on the sides.

So that the pockets and valves are the same in size, you need to put them under the presser foot of the machine one by one and sew with one line. We immediately build the pocket along the contour.

We cut the allowances at the bends obliquely, the allowances of the valve up to 7 mm.

We turn off the turning of the pocket to the inside and pin it, we turn the valves out.

We iron the valves and allowances of the pocket by unscrewing them along the line to the wrong side.
We sharpen the valves by 7 mm, at the pocket we adjust the obtachka.
Step 4

We lay out the vest in one layer, we put pockets according to the marking, on top of them are valves, we close the valve with tape. We lay out the tapes according to the markup. We pin all the details, check the symmetry.
Attention!

Reflective tape on one side is darker. It is she who reflects the light. In order not to confuse, you can photograph the tape from two sides. With the flash you can see which side is lit. We put it on top.
Step 5

Stitch pockets along the contour by unscrewing the valves. Then sew the tape with the valves, then sew the rest of the tape 1 mm from the edge on both sides.
How to make oblique beiks from old ties, read on BurdaStyle.ru
Step 6
For the edging of the armholes and the neckline we overtighten the finished oblique trim in half.
I ironed a fold of cotton fabric at 45 degrees.

Then she cut the strips oblique inks from the bend by 3 cm. And so all the strips: ironed twice - cut off.
Step 7

We turn over the shoulder sections. You can overcast them.
Step 8

We inject a slanting inlay from the face of the jacket onto the armholes so that the slices of the inlay and the slices of the armholes coincide.

Stitch inlay on allowances 1 cm from the fold.

Cut the allowances in rounding and cut to 7 mm.

Unscrew the bias tape for allowances and stitch 1 mm from the seam of the sewing of the tape.
Step 9
Stitch shoulders and slanting inline with one line. Trim the ends of the tape. Iron allowances.Step 10

Unscrew the oblique trim on the inside of the armhole with the transitional edging, sweep and iron.

Stitch the tie 1 mm from its edge along the armholes.
Step 11

To iron a level on a wrong side of a vest, having twisted it 2 times.

Unscrew the strips on the front side along the edge of the side and pin the oblique ends of the strap to the neck.
Step 12

Chop and stitch a slanting inlay on the neck. The ends of the tape should overlap the bar. Cut off allowances in rounding and cut to 7 mm.

Trim and twist the ends of the strips. Unscrew the tape and sew on allowances. Unscrew the trim on the inside. Bast and stitch on the neck in the same way as in armholes.
Step 13

Compare shelf lengths. Unscrew the straps on the bottom of the vest and stitch 3 cm from the bottom. Trim the ends of the bar, turn it out.

Stitch strips on shelves.
Step 14

Tighten the bottom of the vest by 1 and 3 cm, iron, pin and sew on the bottom of the vest.
How to sew a men's shirt: a master class
Step 15

Mark out the clasp. Put the buttons or sew on segments of the Velcro tape so that the hooks are on the inside of the strap (right), and the loops on the front side on the left shelf.

Done!

We give and please our man!

Svetlana Khatskevich
Svetlana graduated from the university with a degree in Industrial Technology. He has been teaching sewing technology for over 20 years. He is a senior lecturer at Burda Academy. We know Svetlana from her work on the site since its inception. She generously shares knowledge and infects with her love for sewing.
Sveta leads her pages on Instagram and Vkontakte.
Sewing is creativity, fascinating and informative. Welcome to this bright and interesting world!
The author of the master class and photo: Svetlana Khatskevich
Material prepared by Julia Dekanova
Share
Pin
Tweet
Send
Share
Send


