A dress with fluttering frills as sleeves is a luxurious option for a festive occasion!
- Special offer

- 1
- 2
- 3
- 4

With the help of this master class, you can sew an elegant dress with original flounces on pattern 118 from Burda 7/2017 with your own hands. Elegant and laid-back straight fit and functional details of the dress - a neckline with a slit in the front and pockets in the side seams. The brilliant structure of the fabric, combined with the matte reverse side and the classic blue color emphasize a sense of style and harmony.
What are ruffles, shuttlecocks and frills
You will need:
- Silk fabric or light dress materials (I used crepe satin fabric) 1.80 m long and 140 wide.
- Flizelin for lung tissues; 1 button.
- Size centimeter
- Copy wheel and paper for pattern translation
- Scissors for cutting fabrics
- Thread Scissors
- Tailor's chalk
- Set of hand and machine needles
- Sewing and basting threads
- Tailor pins
- Ruler marking line

Step 1. Cutting
Retake pattern details on paper. Fold the fabric in half with the front side inward. Lay out the details of the paper pattern on the fabric according to the direction of the shared thread, pin it, circle the pattern on the office with tailor's chalk, mark the allowances for seams and cuts - 1.5 cm, for hemming 4 cm and cut out.
- Before with 1x fold
- Back 2x
- Front shuttlecock 2x
- Shuttlecock 2
- Front neck grinder with 1x fold
- Backrest neckline with 1x fold
- Burlap pocket 4x
Slanting eyelet for an air loop - 7 cm long, 3 cm wide, including allowances.


Step 2. Laying
Fold interlining along the adhesive side in half. To bend the stitches of the front and back necks (parts 5 and 6). Mark with chalk the allowances for seams and cuts - 1.5 cm.

Cut out the details.

Iron the gasket on the seamy side of the linings.

How to sew a jacket with an unusual flounce collar from Burda 10/2017
Step 3. Markup
The contours of all the details of the pattern of the seam line and the bottom, and the transverse marks indicated on the details of the paper pattern are transferred to the wrong side of the details of the cut using tailor's chalk. To do this, stick the pins on the marking and mark with chalk on both layers of fabric.


Step 4. Chest and shoulder tucks
In front and parts of the back of the tuck, bend in half and sweep.
Start tucks starting the seam from the bottom cut to the top of the tuck. Tie the stitches at the top to a knot.

Iron tuck depths in front: down, back: to middle seam.

The basics of sewing: how to tuck
Step 5. Lower sections of shuttlecocks
To process the lower rounded sections of the front and back flounces on the overlock with a “narrow edge” seam.


Step 6. Folds
On the shuttlecocks, lay the folds in the direction of the arrow marks, sweep on the allowances.

Step 7. Shuttlecocks before. Armhole
Put shuttlecocks on the seamy side to the seamy side of the front (the front side inside), pin with pins along the sections of the armholes.

Start, start a line from the top to the cross marks.

From transverse marks, finish the line gently obliquely to the edges of the allowances.

Step 8. Seam allowances
Oversize the armholes and side sections of the front part to overcast on the overlock.

Step 9. WTO. Stitching
Expand the shuttlecocks with the front part in one plane so that the seam allowances are laid on the shuttlecocks. Iron the seam.

From the side of the shuttlecock close to the seam to lay a line.

Unscrew the shuttlecocks on the front side to the front side, iron the edges of the armhole.

WTO Secrets: What does it mean to iron?
Step 10. Basting Slices
Below the armhole, sweep the side sections of the shuttlecocks to the side sections of the front.

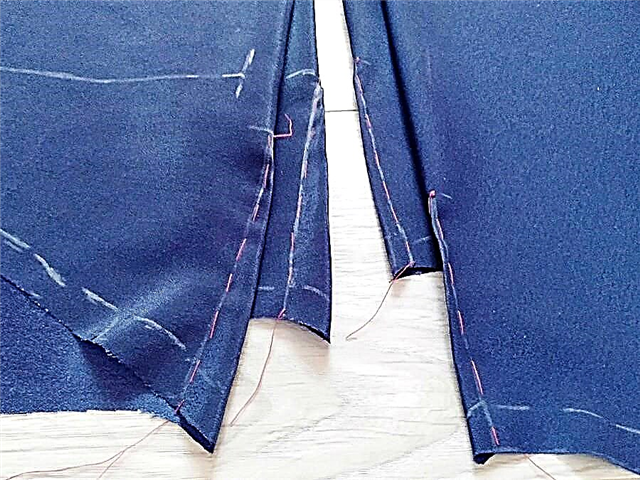
Step 11. The seam lines of the shuttlecocks
Pin shuttlecocks to the front part according to the marking of the stitching seam line.

To start, starting the line from the top to the transverse marks, at the end of the line to sew.

Unscrew the shuttlecocks to the armholes over the stitching seams and sweep to the shoulder sections of the front.

Step 12. Shuttlecocks of the back. Armhole
To put back flounces on back details on the wrong side to the wrong side, to pin down the armholes with pins.

Then repeat as described for shuttlecocks. Start (Step 7, 8, 9, 10).
Step 13. The seam lines of the back flounces
Combine the stitching lines marked on the shuttlecocks with the tucks of the back parts, pin together with pins.

To start, start a line from the top to the transverse marks, at the end of the seam, fasten.

Like the front shuttlecocks, unscrew the shuttlecocks of the back and sweep to the shoulder sections of the front.

Step 14. Shoulder Stitches
Fold with the back facing down to the front. Chipped with pins.

Stitch to the processed lower edges of the shuttlecocks.

Neat seam allowances, each section separately.

Iron the shoulder seams.

Sew the seam allowances manually to the lower edges of the shuttlecocks.

Step 15. Middle back seam
Align the backrest parts along the middle seam with the front side inwards, pin them along the seam with pins and grind.

Neaten seams and iron over welds.

Step 16. Air loop
Fold the oblique trim for the air loop in half, with the wrong side inward. Bend open sections inwards, sweep. Finished finished 5 mm.

Flash manually with a blind stitch.

How to make thread air loops
Step 17. Grinding
Stitch shoulder seams on stitches.

To iron the seams of the shoulder seams on the edges, but do not overcast.

To overcast the stitching cuts on the outside.

Step 18. Neckline
Place the front facing on the front side of the front and back along the neckline, combine the shoulder seams and the marking of the front section, pin together with pins.

Form a loop from the steering wheel, the length of the loop is equal to the size of the button. Pin it between the grind and the part of the front at the upper end of the right edge of the front section, the ends lie over the line of the middle of the front.

Step 19. The neck. Front section
To grind according to allowances to the neck and along the marked lines of the edges of the front cut, fixing the air loop.

Lay a pair of stitches across at the lower end of the cut.

Cut the seam allowances close to the stitch.

At the corners of the section, the front is oblique.

In the fillet points, make notches.

Cut to the lower end of the cut, not reaching a line of about 2 mm.

Step 20. Finishing the neck. WTO
Fold the grind with the product in one plane, lay the allowances on the grinder, lay a line close to the seam. At the front of the cut - to the maximum possible length.

Unscrew the obtachka on the wrong side, straighten the corners at the front cut. Sweep clean, fasten parts with temporary stitches.

Iron.

Step 21. Hand seams. Button
From the wrong side, manually sew a stitch with several stitches to the allowances for the shoulder seams and the middle seam along the back.

Sew a button to the left edge of the front cut.

Step 22. Pockets at the seams. Treatment
Overlock the burlap stocks with an overlock seam.

Place the burlap pockets on the front side of the front side of the side slices in front of the marking. Pin to allowance.

Stitch the burlap pockets along the seam between the marks. Oversize seam pockets remain free. Similarly, grind burlap to the side sections of the back.

Unscrew the burlap, iron at the seams.

Step 23. Side seams
Combine the details of the dress and burlap with each other along the side allowances with the sides inward. Chip along the side seam.

Start the side seam starting from the transverse mark of the armhole and fasten.

Finish the stitches above and below the stitching lines of the burlap pockets. Lay the line a little to the left of the seam of the burlap sacking;

Repeat similarly with the second side seam.
Step 24. Oversizes of burlap pockets
Bend oversized burlap pockets, chop along the contour with pins.

Sew pocket burlap along the contour; pocket allowances remain free.

Step 25. WTO side seams
Iron the side seams.

Step 26. Bending the bottom
Iron the bottom hem allowance onto the seamy side and sew on manually with loose stitches.

The dress-making workshop has been completed. Thank you for the attention! I wish you every success!
Simple and beautiful: Burda style Chanel dress
About the author
My name is Anastasia, I am 27 years old, I live in Russia, Chelyabinsk region, the city of Magnitogorsk. I am a lover of sewing and needlework, I sew women’s clothes, sometimes I sew for my beloved husband. I like to sew stylish and high-quality clothes with my own hands, starting from underwear and ending with a coat. And also I am engaged in the creation of toys: textile dolls and animals. I do not stop there and am constantly developing in the sewing business.
My VKontakte page //vk.com/id30049422, profile on burdastyle.ru AnastasiaKomarova.


