It often happens that the model you like is not suitable for growth, but this is fixable. We will show how to lengthen a pattern designed for short women, as well as for women of standard height.
Condition for a flawless fit:
the pattern should match your chest / hips.
General rules

Draw on the appropriate details of the pattern corrective (dashed) lines.
Important!
the lines are drawn strictly at right angles to the direction arrow of the shared thread!
If your height is 160 cm, 168 cm or 176 cm and your main measurements coincide with the measurements given in the Burda size chart, then you can change the pattern along the auxiliary lines to the number of millimeters indicated in the figures.
Burda Size Charts. How to take measurements
If your basic measurements differ from the data given in the Burda tables, then the number of millimeters to shorten or lengthen the pattern should be determined by you yourself.
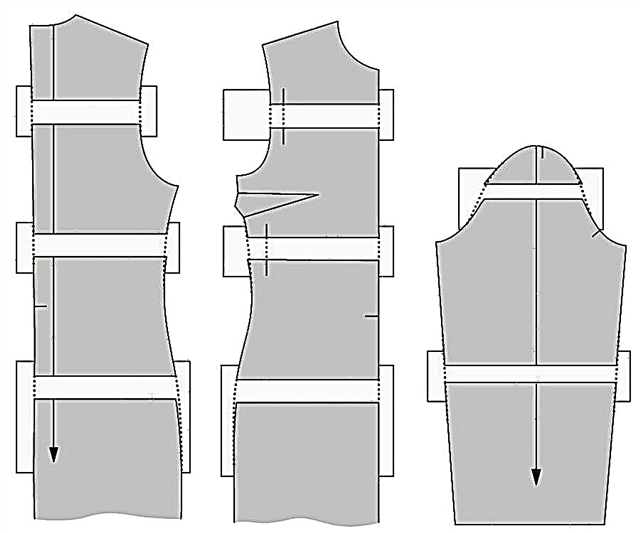
For jackets, coats, dresses and blouses, the main rule applies:
the pattern is extended at two levels: at half the height of the armhole - by 1/3 of the required number of millimeters and between the armhole and waistline by 2/3 of the desired number of millimeters.
Pants at the upper level are elongated by 10 mm, at each of the other two levels - above and below the knee - by half of the remaining necessary size.
How to lengthen a pattern
Cut the pattern along the correction lines.
Glue a strip of paper under the cut.
In parallel to this cut, draw a line of alignment on a strip of paper. The distance between these lines is the amount by which to extend the pattern.
Glue the cut part of the pattern to the paper strip along the alignment line.
Similarly, add length along other adjustment lines.
Important!
so that the parts do not move to the side, put the direction arrow of the shared thread onto the paper strip.
When gluing parts, the direction arrow of the shared thread should again be a straight line.
Women's Size Comparison Chart Burda
Before you start ...
Stand in front of the mirror and attach the pattern to your figure - it will immediately become clear to you where and how much you need to change it.
Before starting work, put together all the pattern details to be adjusted.
So that when the parts are elongated, the patterns do not move to the side, draw a vertical line, respectively, along the correction lines.

For models with vertical tucks on the shelves / front, lay the tuck before drawing correction lines. To do this, cut the pattern from the side cut to the top of the tuck (a).
Lay the vertical tuck so that a tuck is formed on the chest (b).
After lengthening the pattern, glue the tuck sections on the chest again.
How to shorten a pattern
Product length: how to change and lengthen a pattern
Photo: BurdaStyle.ru