Share
Pin
Tweet
Send
Share
Send
You will not regret if you dare to sew this model without a collar, with sleeves three quarters. Faux fur not only looks noble, it can also hide small inaccuracies in your work.
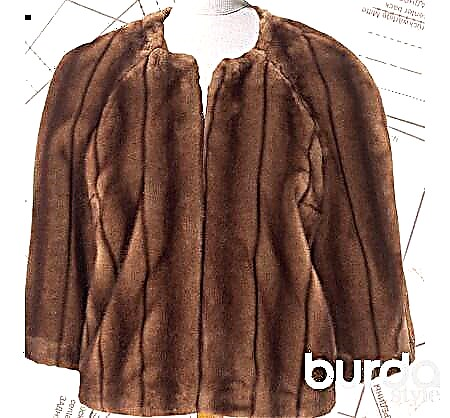
Fur jacket, model 113 from Burda magazine 12−2011
YOU WILL NEED:
• faux fur 140 cm wide: sizes 38, 40 - 1.35 m, sizes 42, 44, 46 - 1.60 m;
• lining fabric 1.10 m wide 140 cm for all sizes;
• threads for sewing, needle of the sewing machine No. 80.
Besides:
• silk paper for transferring patterns from a sheet of patterns;
• pencil, paper scissors;
• tape measure;
• tailor pins;
• tailor's chalk;
• scissors for cutting and small scissors for needlework;
• carbon paper burda, cutter to translate the pattern.

Pattern
... pink, so it is easy to find on the sheets of patterns. Put silk paper on a sheet of patterns and pin it. Translate the details of the pattern of your size along the corresponding contour lines and do not forget about the marking and inscriptions, as well as the cross marks! Cut out the details of the pattern.

Layout Plans
... show how to place paper pattern details on faux fur / lining.
Faux fur lay in one layer with the wrong side up.
Pay attention to the direction of the pile (top to bottom) of the faux fur.
Fold the lining twice with the front side inwards.

1 shelf 2x *
2 backrest 1x with fold *
3 Front of the sleeve 2x *
4 Elbow 2x *
5 Turning the neckline with a fold 1x
* = Cut out the details also from the lining fabric to the lining lines.

Advice
You can simplify your cutting of faux fur by retaking the details of the pattern twice. Glue the details of the back and the back of the neck of the back along the lines of the middle of the back.
The size of the jacket is determined by the circumference of the chest (size 38 = 88 cm, 40 = 92 cm, size 42 = 96 cm, size 44 = 100 cm, size 46 = 104 cm).

Featured Fabrics
faux fur with a pile length of approx. 1-1.5 cm.

Cut faux fur
Faux fur lay in one layer on the table with the fur side down. Overlay the details of the pattern according to the layout plan, pin it. Mark around the details of the pattern with tailor's chalk allowances: for hemming the bottom of the jacket and the bottom of the sleeves - 4 cm, for all other sections - 1.5 cm (top: sizes 38, 40). Cut out the details by cutting only the fabric base and without damaging the fur itself.

Seam lines and marking
Draw on the details of the cut from faux fur the lines of the seams and the bottom, put the transverse marks. To draw tucks, cut the paper pattern of the shelf along the top line of the tuck to the top of the tuck. Turn the tuck depth along the bottom tuck line down. Unbolt the whole board with a shelf and unscrew it along the fold line to the shelf (= side edge line). On each shelf, draw the tuck lines and the fold line.

Cut lining
Cut the details of the paper pattern along the drawn lining lines. Fold Part 2 along the midline of the back. Apply the details of the paper pattern to the lining fabric according to the layout plan, apply the paper pattern of the back to the lining fabric, aligning the line of the middle of the back with the fold of the fabric. Cut out the lining details with allowances for 1.5 cm seams. For the cut parts, use the copy wheel to transfer the lines of the darts, seams, bottom, as well as the transverse marks.SEWING

Tucks
Fold each shelf along the line of the middle of the tuck with the front side inward, chip the lines of the tuck. Stitch the tuck by starting the stitch from the side cut (at the beginning of the stitch, sew). Do not tack at the top of the tuck. Tie the stitches. Turn the tuck depth down.

Side seams
Place the shelves on the back with the front side to the front side, chop off the side sections on each side.Make side seams (allowances for 1.5 cm seams), during the stitching process, thread the villi inward with a darn needle. Iron the seam allowances with a moderately heated iron, having previously tried on an unnecessary shred.

Lower seams of sleeves
Place the front part of each sleeve on the elbow part of the sleeve with the front side to the front side, chop off the sections. On the sleeve, perform the lower seam (seam allowances of 1.5 cm), tucking the villi inward with a darn needle. Iron seam allowances.

Sewing sleeves
Insert each sleeve into the armholes of the shelves and backs with the front side to the front side, aligning the side seam with the bottom seam of the sleeve and the transverse marks on the sleeve and on the armhole of the shelf. Stitch the sleeve (seam allowances 1.5 cm). Flatten the seam allowances from the top to the beginning of the rounding of the armhole.

Upper seams of sleeves
Place the shelves on the back with the front side to the front side, fold the sleeves lengthwise, cut off the upper sections on the sleeves. Complete the upper seams of the sleeves. Iron the seam allowances. Turn the jacket face out.

Neckline, edges
Turn off the whole-cut with shelves of pick-up along the lines of the folds on the front side of the jacket. Shoulder slices of the back of the neckline, chop off the shoulder slices of the picks with the front sides, grind. Iron the seam allowances.

Picking the edge of the neckline and grind it to the neckline cut. Lay a stitch along the neckline. Cut the seam allowances to a width of 5 mm, cut obliquely at the corners of the seam allowance, make notches in the rounding areas. Unscrew the pick-up and the back of the neckline to the wrong side. Iron the edges (from the side of the picks and edges) through the iron.

Jacket hem hem
Iron in the allowances for hemming the bottom of the jacket and the bottom of the sleeves - 4 cm wide - on the wrong side, while unscrewing the bottom of the bends forward again. Sew the allowances for the hem of the sleeves by hand with loose stitches; the only allowance for the hem of the bottom of the jacket is to pin it.

Lining
Stitch breast tucks on the lining, iron tuck depths down. Sew the side seams and the bottom seams of the sleeves. Iron the seam allowances. Stitch the sleeves. On the sleeves, sew the upper seams. Turn the lining facing out.

Sewing the lining to the jacket
Pin the lining to the inner sections of the flanges and the back of the neck, while the allowance for the hem of the bottom of the jacket is turned down again. Combine the upper seams of the lining sleeves with the shoulder seams of the seams and the back of the neckline. Stitch the lining to the seams and the back of the neck.

Insert the lining into the jacket with the wrong side to the wrong side, put the lining sleeves into the jacket sleeves. The hem allowance on the bottom of the jacket is again turned up, sew by hand. Unscrew the seam on the wrong side. Tuck the lower cut of the lining at the lower edge of the jacket, slightly bend the fold and pull it upward with a soft arc to the edge of the hem for the hem of the jacket. Pin the lining and sew it by hand.

Turn the bottom cut of the lining of each sleeve to a width of 1 cm. Pin the lining to the upper edge of the hem allowance for the bottom of the jacket sleeve, sew it by hand.
Photo: U2 / Uli Glazeman. Illustrations: Elke Trier-Schäfer.
Share
Pin
Tweet
Send
Share
Send