Share
Pin
Tweet
Send
Share
Send
Fitted jackets and dresses are trendy this season, but they should fit perfectly. And what if the waist is not in place? Of course, change the pattern!
Burda patterns, regardless of size (34, 36, 38, etc.) are designed for height 168 cm and the standard proportions of the figure. If these proportions are violated, for example, the waist is too short or long, then the clothes will not sit well. Therefore, carefully take your measurements and carefully compare them with the data in the Burda Size Chart, paying particular attention to the measurement "Back Length".If your measurement does not coincide with that given in the table, then it is necessary to adjust the pattern to the appropriate number of centimeters.
How to return the waist to the right place
Add 1.5 cm or more:
On the paper patterns of the front / shelf and back, draw 2 horizontal auxiliary lines strictly perpendicular to the direction arrow of the shared thread: the upper one is half the height of the armhole, the lower one is in the middle between the armhole and the waistline (1).
Cut the patterns along the drawn lines, lay the stripes of paper strictly horizontally and stick them. At the top, the pattern extends 1/3 of the desired number, and below - 2/3 (2).
Make sure that the directional arrow of the shared thread lies on one straight line. To simplify the adjustment process, you can draw horizontal alignment lines on paper strips.
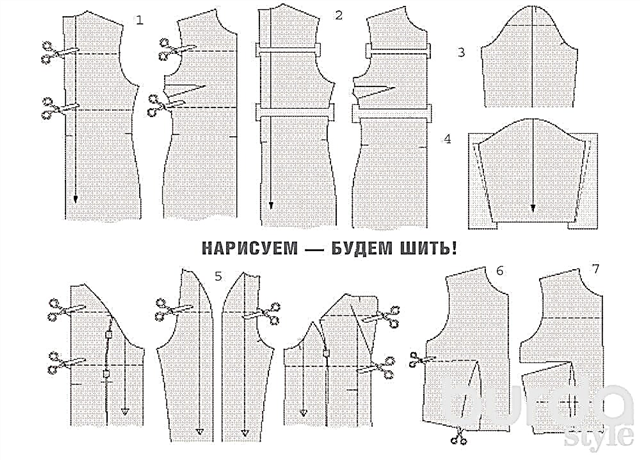
In order for the sleeve to fit well, its pattern should also be changed in the upper third of the okata by 1/3 of the desired number of centimeters (3).
A sleeve with a flat okata expands on the sides by the desired number of centimeters (4).
Models with embossed seams or raglan sleeves
Fold the relevant details of the pattern together and glue. Draw auxiliary lines half the height of the armhole and in the middle between the armhole and the waistline, cut the patterns (5) and glue the paper stripes - see above.
Vertical Tuck Models
Before adjusting the patterns, lay a tuck. It is most convenient to cut the pattern strictly horizontally from the lateral edge to the top of the tuck, cut it along the lateral line of the tuck (6) and glue the edge of the tuck (7). Then lengthen the pattern as described above. Now bring everything back: peel off the edge of the vertical tuck and glue the edges of the tuck on the chest.
Add less than 1.5 cm
The increase should be made only along the lower auxiliary line (in the middle between the armhole and the waistline). The armholes and sleeves remain unchanged.
Share
Pin
Tweet
Send
Share
Send